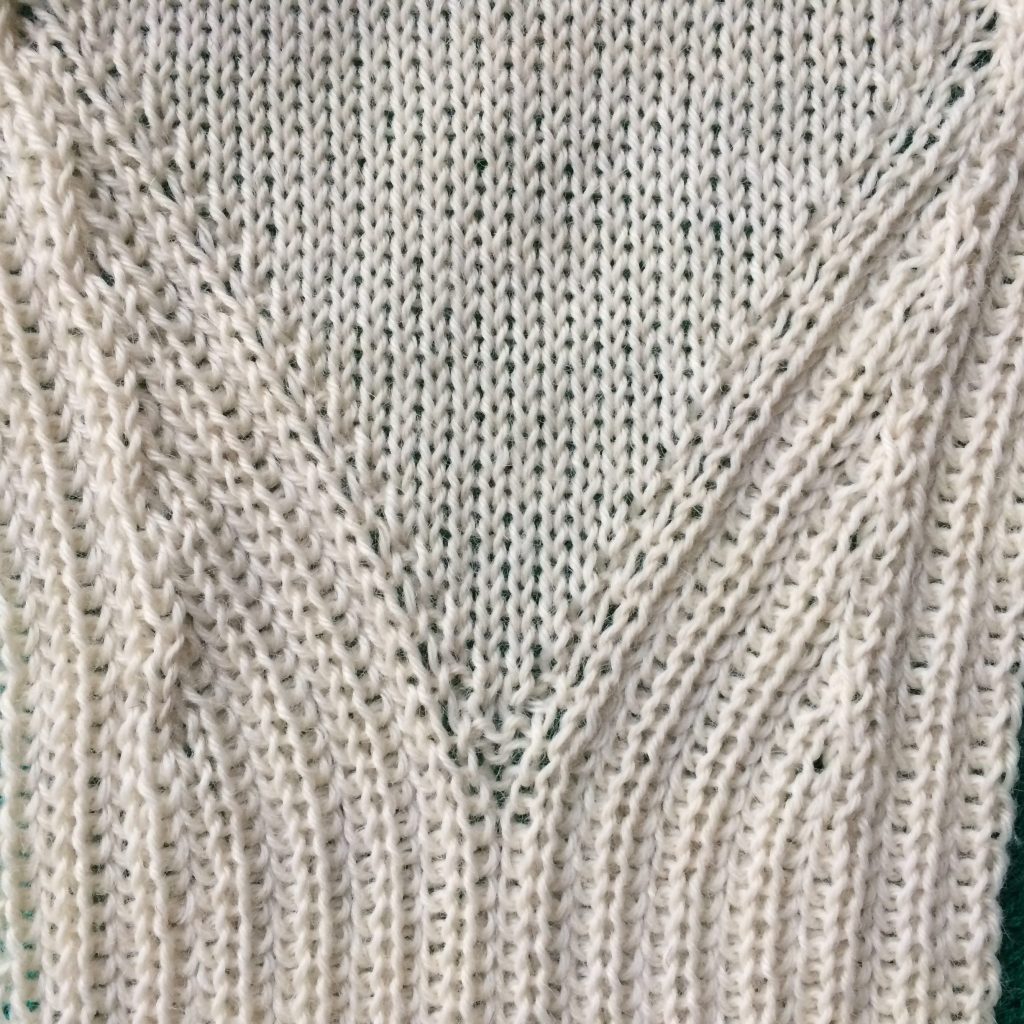
I fell in love with this tank the moment I saw it.
After a lot of speculation about how it’s done, I managed to get my hands on the original pattern, painstakingly translated it from French to English and managed to duplicate the slanted rib pattern on a knitting machine.
If you’re not scared off by lots of transfers, it’s pretty easy once you get a rhythm going. Here’s how…
The pattern must be knit over a multiple of 4 plus 2. If you’re going to try a swatch on a standard gauge machine, cast on for 2×2 rib over 54 needles (27L to 27R):
- The two center needles (1) must be in work on the front bed.
- The four edge needles (2,3) can be on either bed, but they must be on the same bed. In our 54 needle sample, they will be on the back bed.
You can use any cast on you like, but my personal preference is broken toe.
Knit 2-3 inches of 2×2 rib, ending with the carriage on the right.
The pattern will be a lot easier to understand if you look at it as 5 sections:
- The two static rib sections (1) at the sides (shown in orange) – This section consists of some number of 2×2 rib pairs with the innermost pair always on the back bed. If the edge pairs are on the front bed, there will be an even number of pairs in the side ribs. If the edge pairs are on the back bed, there will be an odd number of pairs in the side ribs. The width of this section never changes. The rest of these instructions will assume there are 5 pairs of side ribs on each side — 2 on the front bed and 3 on the back bed spanning needles 18 to 27.
- The two slanting rib sections (2) between the stockinette center and the side ribs (shown in yellow) – This section will slant towards the sides and give the appearance of disappearing behind the side ribs.
- The stockinette center (3) that forms the V (shown in green) – This section starts out on the ribber, but once we start the transfers, this section will grow wider by two stitches (one each side) every two rows. This section will always be flanked by one stitch in work on the front bed.
Now… just one more thing before we start. We’re going to give some nicknames to a few of our needles:
- This is the anchor. This needle represents the inner edge of the side rib section. Every two rows, we’ll be transferring an extra stitch to the anchor, but otherwise the stitches between the selvage up to and including the anchor will remain on their needles throughout.
- These two stitches are the orphans (you’ll see why in a moment). Every two rows, we’ll be transferring the orphans to the back bed. This is what forms the V-shaped stockinette section in the center.
The V-pattern is created by performing the same 4 (or 5) steps every two rows:
- Starting at the left anchor (1), find the next stitch towards the center and transfer that stitch to the anchor. This leaves a 1 needle gap (2). Do the same for the right anchor. Note that because the slanting ribs are traveling towards the edge, the stitch next to the anchor may be on either bed.
- Starting at the left gap (2) and working towards the left orphan (4), transfer each stitch (3) one needle towards the left edge on the same bed. Now you have a 1 needle gap (5) between the slanting rib section and the left orphan. Do the same for the stitches between the right anchor and orphan.
- Transfer the left and right orphans (4) to their respective needles on the back bed.
- Pick up the heel of the stitch immediately to the left of the old left orphan and create a new orphan in the left gap (5). Note how your left orphan has now moved 1 needle closer to the left edge. Repeat to create a new right orphan using the stitch immediately to the right of the old right orphan.
- Optional: If there are more than two consecutive needles in work on the back bed at the anchor (1), you can do one of two things:
- Leave it alone. It may look wrong, but it’ll turn out just fine. The one or two extra knit stitches will happily disappear behind the side ribs as you knit subsequent rows. This was the method I used in the sample shown below and you can clearly see a little wave at the anchor.
- Transfer one stitch from the back bed to the front bed to maintain a purl ditch just inside the side ribs. This will produce a straighter edge at the anchor.
Now, it looks like this:
- The anchor (1) holds two stitches.
- The slanting ribs (2) are shifted over by one needle.
- We have a new orphan (3). From this point forward, the orphan will be a single purl stitch on either side of the stockinette section in the center.
- The center stockinette (4) section has grown wider by two stitches.
Knit two rows and repeat the same steps until all that’s left on the front bed between the anchors are the two orphans (one on each side).
If you have more rows to knit before you reach the bind off at the armhole, you’ll continue doing transfers every two rows as follows:
- Transfer the orphans to the anchors on each side.
- Create new orphans by picking up the heels of the old orphans and hanging them in the gaps on the ribber.
Here’s a closeup of our complete swatch:
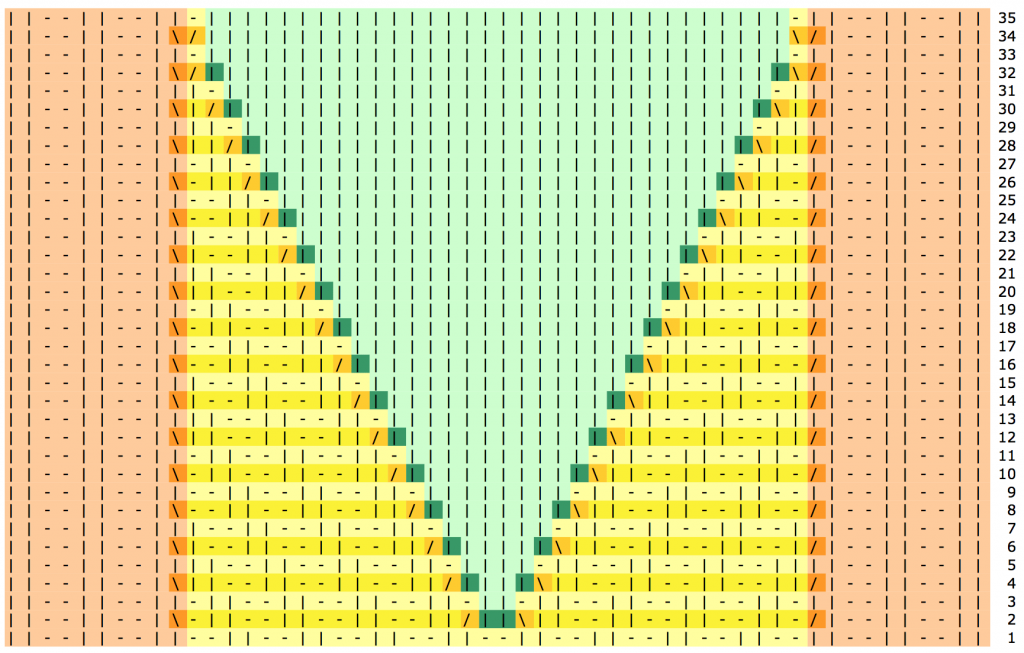
And here’s the chart:
- Row 1 is repeated for the length of the rib.
- Rows 2-33 create the V-pattern. The number of rows in the pattern will depend on the width of the piece.
- The dark orange stitches are the decreases made by transferring the adjacent yellow stitch in the previous row to the back bed (two stitches on these needles).
- The dark yellow stitches were transferred one needle right or left on the same bed.
- The gold stitches are the increases made hanging the heel of the adjacent yellow stitch on the empty front bed needle.
- The dark green stitches were transferred from the front bed to the back bed.
- Rows 34-35 are repeated up to the armhole shaping.


Wish thete was a video to accompany the explanation.