Take only what you need and earn the rest. #WelfareReform
Monthly Archives: August 2013
When I was a kid, negotiating with my #parents or…
When I was a kid, negotiating with my #parents or #teachers was not an option.
Service-Oriented Architecture (#SOA) http://t.co/H…
Service-Oriented Architecture (#SOA) http://t.co/HUBUBfCu5K
Looking forward to the 2013 Hopkinton State Fair h…
Looking forward to the 2013 Hopkinton State Fair https://t.co/s5K9cvAX7a
Inquiring minds want to know…
The rock wall that used to run through the middle of our front yard — hopefully the marsh hawk won’t mind that we removed it
No more ugly rock wall running through the middle…
No more ugly rock wall running through the middle of the front yard http://t.co/OMLa9s1m7e
No more ugly rock wall running through the middle of the front yard
Ok… so maybe my brother-in-law buying a big excavator wasn’t a bad idea after all!
When I die, I want to be reincarnated as a #Leonbe…
When I die, I want to be reincarnated as a #Leonberger http://t.co/XOJsTcyWQD
When I die, I want to be reincarnated as a Leonberger
Dakota snoozing in the sun coming through the window
Machine Knit Double-Bed Sock: Short Row Heels Without Holes
Let’s face it. Sometimes you just want to knit a plain, no-frills sock — short row heels and toes, nothing fancy. It shouldn’t take more than a couple of hours. But no matter how hard you try, you knit and frog until you’re completely frustrated as you sit and stare at a pile of crinkled yarn and bare feet.
I’m going to show you how to knit what I call the good-enough-4-me heel. Well… eventually… first I’m going to tell you what causes those nasty little holes in the first place.
Knitting is created with one long continuous thread. When the thread of one stitch isn’t connected to the stitches on either side, you get a hole. That’s really handy if you want a buttonhole, but not so good for a sock heel.
Since you form your short row heel on one bed, the trick is to make sure the edge stitches on both beds are connected when you either begin or end your short rows. You can use this method on both Japanese and French machines for toe-up or cuff down socks regardless of whether you knit your heel on the front or back bed.
How To Knit The Good-Enough-4-Me Heel
When you’re at the end of your circular rows, the last carriage pass must be done on the bed opposite the heel. If you’re going to shape your heel on the back bed, the last pass is on the front bed and vice versa. This may mean that the front of your sock has one more row than the back, but that’s okay. It’ll work out — I promise.
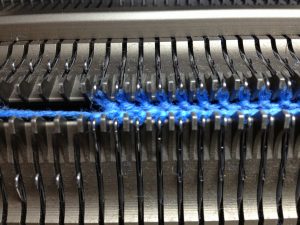
On my Superba, my carriages only knit right to left on the front bed and left to right on the back bed. I shape my heel on the back bed so after knitting my last circular row, my carriage is to my left.
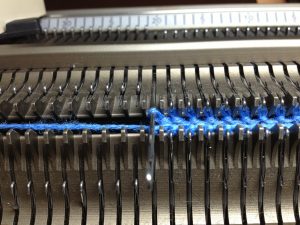 After knitting the last circular row, pull the edge needle next to the carriage to hold. See how the yarn running from the carriage runs underneath the needle? This will manually wrap the needle when we knit across.
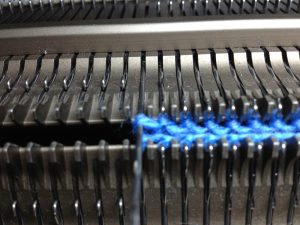 Now knit across. Notice how the yarn travelled from the non-heel bed and floats across the held needle. That’s the thread that will connect the last circular row to the first row of your short rows on this side.
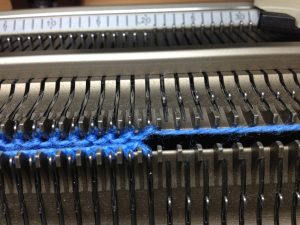 The carriage is now on the right side.
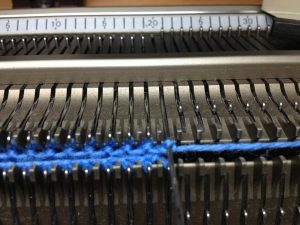 Pull the needle next to the carriage to hold…
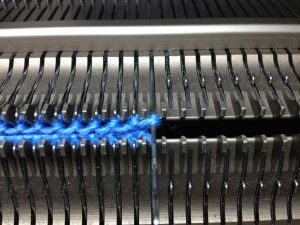 … and knit across. You now have two needles in hold — one on each side. You’ve done two carriage passes and the carriage is back at the side where you started your short rows. For me, that’s on the left.
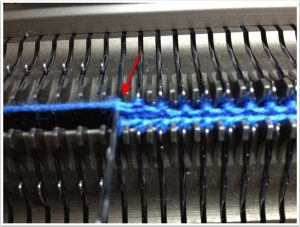 On the carriage side, notice how the thread from the carriage is laying on top of the edge needle. We want to manually wrap the edge needle a second time, so grab that thread…
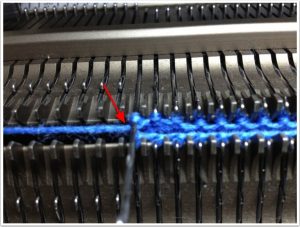 … and move it underneath the edge needle so it will manually wrap the needle on the next carriage pass.
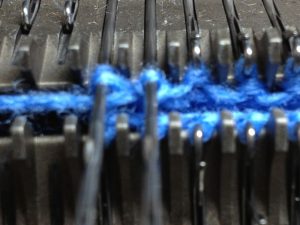 Pull one more needle on the carriage side to hold…
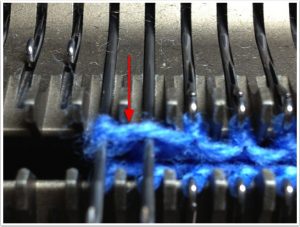 … and knit across. See how the yarn is now floating over the two edge needles. Yes, it looks strange, but ignore it. This is exactly what you want.
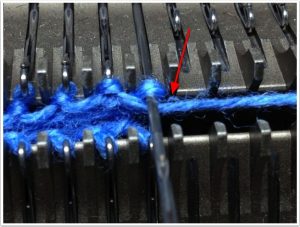 Now do the same for the other side. Move the yarn underneath the edge needle…
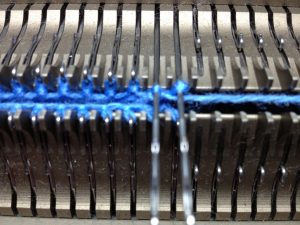 … pull another needle to hold and knit across.
You now have four needles in hold, you’ve done four carriage passes, the two edge needles are manually wrapped, there’s a short float running on top of the two edge needles on both sides and the carriage is once again back at the side where you started your short rows.
That’s the end of the manual wrapping for now. Continue to work normal short rows: pull the next needle to hold on the carriage side and knit across, but when you get to the last needle, don’t knit across yet… you need to end the decreases and start the increases on the opposite side in the same row. In other words, at the same time you pull the last needle to hold, you’ll want to push the centermost held needle opposite the carriage back to UWP. Then knit that row. If you happen to forget, it’s not the end of the world — just push that needle to UWP and knit it off manually.
Continue with the increases until only the two edge needles remain in hold. The carriage will be on the side opposite to where it was when you started your short rows. In fact, it must be on that side in order for this to work. The only way the carriage can end up on the wrong side is if you didn’t hold the same number of needles on each side or if you forgot to start the increases in the same row as the last decrease.
We’re not going to knit those last two held needles until after we’ve switched back to circular. The next carriage pass will be on the bed opposite the heel, so you need to use a one-prong tool to manually move those two edge needles back to WP with their stitches and floats in the hooks. If you just push those needles to UWP on a White/Superba, they’ll knit off before they’re supposed to and that’s not what we want. Japanese machines may work differently, but if you want to play it safe — just push them to WP.
Notice that the yarn coming from the carriage simply floats above the edge needle next to it — just like it did when we held the first needle on the other side. This is exactly what you want. This is the thread that’s going to connect the stitch on this side of the heel to the next stitch on the opposite bed.
Set the carriages to circular making sure that the next pass of the carriage will knit on the bed opposite the heel. Continue knitting the rest of your circular foot or ankle.