Let’s face it. Sometimes you just want to knit a plain, no-frills sock — short row heels and toes, nothing fancy. It shouldn’t take more than a couple of hours. But no matter how hard you try, you knit and frog until you’re completely frustrated as you sit and stare at a pile of crinkled yarn and bare feet.
I’m going to show you how to knit what I call the good-enough-4-me heel. Well… eventually… first I’m going to tell you what causes those nasty little holes in the first place.
Knitting is created with one long continuous thread. When the thread of one stitch isn’t connected to the stitches on either side, you get a hole. That’s really handy if you want a buttonhole, but not so good for a sock heel.
Since you form your short row heel on one bed, the trick is to make sure the edge stitches on both beds are connected when you either begin or end your short rows. You can use this method on both Japanese and French machines for toe-up or cuff down socks regardless of whether you knit your heel on the front or back bed.
How To Knit The Good-Enough-4-Me Heel
When you’re at the end of your circular rows, the last carriage pass must be done on the bed opposite the heel. If you’re going to shape your heel on the back bed, the last pass is on the front bed and vice versa. This may mean that the front of your sock has one more row than the back, but that’s okay. It’ll work out — I promise.
On my Superba, my carriages only knit right to left on the front bed and left to right on the back bed. I shape my heel on the back bed so after knitting my last circular row, my carriage is to my left.
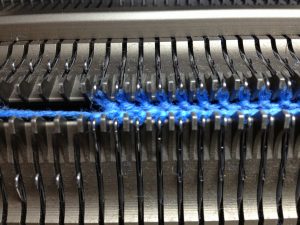
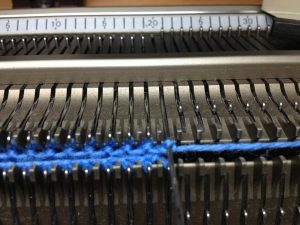
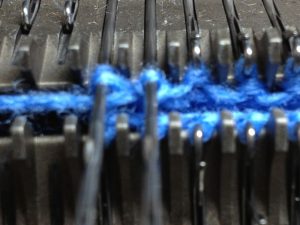
 After knitting the last circular row, pull the edge needle next to the carriage to hold. See how the yarn running from the carriage runs underneath the needle? This will manually wrap the needle when we knit across.
 Now knit across. Notice how the yarn travelled from the non-heel bed and floats across the held needle. That’s the thread that will connect the last circular row to the first row of your short rows on this side.
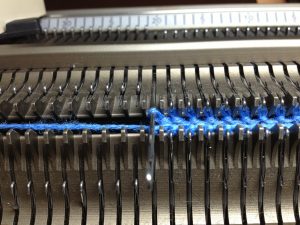
 The carriage is now on the right side.
 Pull the needle next to the carriage to hold…
 … and knit across. You now have two needles in hold — one on each side. You’ve done two carriage passes and the carriage is back at the side where you started your short rows. For me, that’s on the left.
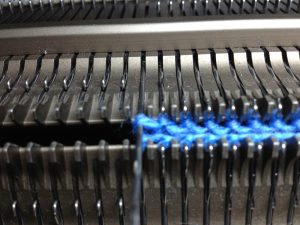
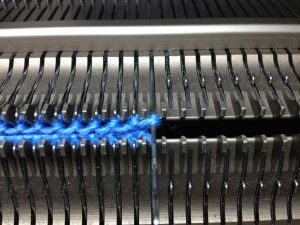
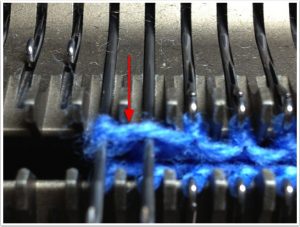
 On the carriage side, notice how the thread from the carriage is laying on top of the edge needle. We want to manually wrap the edge needle a second time, so grab that thread…
 … and move it underneath the edge needle so it will manually wrap the needle on the next carriage pass.
 Pull one more needle on the carriage side to hold…
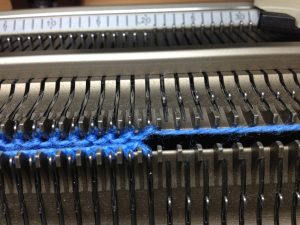
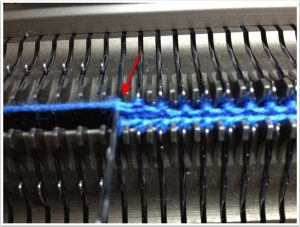
 … and knit across. See how the yarn is now floating over the two edge needles. Yes, it looks strange, but ignore it. This is exactly what you want.
 Now do the same for the other side. Move the yarn underneath the edge needle…
 … pull another needle to hold and knit across.
You now have four needles in hold, you’ve done four carriage passes, the two edge needles are manually wrapped, there’s a short float running on top of the two edge needles on both sides and the carriage is once again back at the side where you started your short rows.
That’s the end of the manual wrapping for now. Continue to work normal short rows: pull the next needle to hold on the carriage side and knit across, but when you get to the last needle, don’t knit across yet… you need to end the decreases and start the increases on the opposite side in the same row. In other words, at the same time you pull the last needle to hold, you’ll want to push the centermost held needle opposite the carriage back to UWP. Then knit that row. If you happen to forget, it’s not the end of the world — just push that needle to UWP and knit it off manually.
Continue with the increases until only the two edge needles remain in hold. The carriage will be on the side opposite to where it was when you started your short rows. In fact, it must be on that side in order for this to work. The only way the carriage can end up on the wrong side is if you didn’t hold the same number of needles on each side or if you forgot to start the increases in the same row as the last decrease.
We’re not going to knit those last two held needles until after we’ve switched back to circular. The next carriage pass will be on the bed opposite the heel, so you need to use a one-prong tool to manually move those two edge needles back to WP with their stitches and floats in the hooks. If you just push those needles to UWP on a White/Superba, they’ll knit off before they’re supposed to and that’s not what we want. Japanese machines may work differently, but if you want to play it safe — just push them to WP.
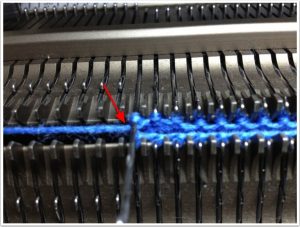
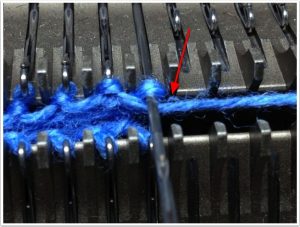
Notice that the yarn coming from the carriage simply floats above the edge needle next to it — just like it did when we held the first needle on the other side. This is exactly what you want. This is the thread that’s going to connect the stitch on this side of the heel to the next stitch on the opposite bed.
Set the carriages to circular making sure that the next pass of the carriage will knit on the bed opposite the heel. Continue knitting the rest of your circular foot or ankle.
Thanks for sharing this, Brenda. You’ve spent a lot of time and effort in both perfecting the technique and posting to your blog for us. Both are great.
Wow, Brenda. It’s so generous of you to document and share your method. It looks great. I can’t wait to try it out.
Thanks. I’m still tweaking, but I’m significantly happier with these heels than I have been with my previous attempts. Stay tuned… I’m determined to discover the never-fail perfect heel!
After the decreases and increases you talk about the last two needles in hold, connect ribber bed again, knit on ribber, then main bed over all needles. Do you mean the last two needles on each side, 4 total, or one needle on each side?
4 total — last two held needles on each side.
Thanks so much. This is the best method to avoid the holes.
I actually tried both ways, with 2 needles on each side and one on each side. Both comes out nicely.
So glad it worked for you. I actually have one more thing I want to try, but there aren’t enough hours in the day… sigh…
Hi, can you tell me if you still have to take up or reverse the stitches at the end of the rows on the main & back beds? I do find that the front bed stitches really stretch loose from all the dropping the bed during the weight placement that is done every few rows.
Regards,
Brian Smiley
aka mrb123 on Ravelry
That’s a great question. I don’t have that issue because I generally don’t drop my bed to move my weights — I use heel grips which are a little easier to hang without dropping the bed. On the few occasions when I do, I try to ease the end needles up to hold position so the stitches don’t stretch so much. Any residual stretch can usually be corrected after the sock is off the machine.
Thanks for the reply, however what are heel grips, and a picture of them would be great to see. Would you mind sending me a pic?
Thanks so much,
Brian
I think I know what you mean about the heel grips. I just did a search on ebay. Time to order more of them!!
Glad you figured it out. Mine look like this. Would love to hear what you think of them and whether you like them better than the other weights for socks.
I have 2 of them now, however one is missing almost all the teeth. I like the idea of a long ‘handle’ on them, makes it easier to give them a tug. That’s why earlier in the thread I had posted a diy solution by bending a coat hanger and attaching to my other weights, just so that I could have an easier time giving the weights a tug when & where it was needed.
I would like to try your sock heel on my Superba. Is it okay if I copy to my computer? I don’t know what URI means so couldn’t fill that part in. : )
Of course it’s okay. You’re so kind for asking.
This is quite a coincidence as I’m just now taking a break from my current sock. I’ve been dying to try another little tweak and if I go too fast, I mess up 🙂
Hello Brenda,
I love your great Tutorial.
May I translate your instruction into german for those people at two german knitting machine groups on Facebook that don`t understand the english instruction? Of course with notes to the original author and webside.
with warm greetings from Germany
Sabine
Go for it! Happy I can be of some help.
Thank you very much, Brenda.
I am not very good on the ribber at the moment but do you have a pattern for the socks on the main bed?
Sorry, I don’t. But one of the best single bed sock patterns I know of is the S.W.A.N sock by the late Lucy Desgrey. Lucy passed away a few years ago, but her sister made arrangements to keep the pattern available. You’ll find it on Ravelry here. The price may seem a little high for a sock pattern, but I promise you won’t be disappointed.
The pattern is well written, there are different patterns for both single and double bed as well as different kinds of heels. You probably won’t need any help, but I think there’s still an active Yahoo group where folks help each other out should you get stuck.
My goal this year has been to make socks…I can’t believe all the things that went wrong. But I finally was able to complete the sock and now I can tackle the holes. I tried your technique…not sure I completed it correctly as you didn’t put pictures up of the last stages..It looked better than the other things Ive tried…not sure I understand the increase/decrease instructions or what to do with the end needles that are in hold when I go back to circular knitting.Do you have any other pictures of the rest of the stages. thanks, Kanella
Glad to know the post may have been of some help. I’m about due to do another pair of socks so I’ll try to post some additional photos of the final steps — probably not until the weekend, though.
The trick to switching back to circular is that all needles need to knit. So if your last pass was on the front bed and the next pass is on the back bed, you need to push all held needles back to UWP before you make that pass on the back bed (assuming you’re shaping your heel on the back bed).
While you’re waiting for my photos, you might want to check out this post. It’s a little fidgety while you’re figuring it out, but it makes a lovely heel and it’s not any more difficult than a normal shortrow heel once you get used to it.
Thank you…I look forward to seeing some more pictures and getting the technique mastered. I do best when I can see a picture of whats going on.
I don’t know how I missed this…but I realized that you don’t need to lower the ribber bed when you short row. I use a brother machine…and need to drop the ribber bed. Thanks, anyway…your technique even with lowering the ribber bed was still an improvement..Kanella
Its 2021 now and I am learning to use the Superba, knit socks etc and I thank you for this very good advise. I will use it on my next pair.
I am looking for this conversation on Ravelry to better understand it and maybe see some sample socks?
The one question I have is probably dumb but, if it’s fashioned after the sweet tomato heel which is knitted on 2/3 of the total stitches, are we replicating this? If so how do we divide the stitches up between the beds?
Thanks
Good question. Technically, this borrows a few of the same concepts as the sweet tomato heel, but it’s not the same. It’s basically a variation that changes the way you start and end the short rows so you don’t have a gap. Other than that, it’s identical to a standard short row heel. So you still work with half the stitches on the main bed and the other half on the ribber.
Thank you,
I’ve been reading the tutorial. I think I’ll do a sample before my next sock.
I appreciate all your information and how much you’ve shared!
Any future in video tutorials? You’d be great at it!
You are fantastic!!!! I am now able to knit a decent sock on my machine. The hours I have spent trying to get it right – and now your instructions are just perfect. Thank you for taking the time to write it all down and put in pictures.
Yours ever gratefully
Julia 😊😊
Thank you so much for this, I use to just use the latch tool to close them up and fix them with a stitch or two. Much better if we can do it on the machine. 🙂