Machine Knit Leg Warmers / Boot Toppers

Tomorrow is New Year’s Day. No commitments, have lots of time of knit, looking forward to doing the first project of the year and the forecast high for Thursday is 10 degrees. It’s a perfect time to whip up a pair of leg warmers. These were knit flat on a Brother KH860 with KR850 ribber using Franklin Sock Yarn from Valley Yarns.

Gauge

Stockinette: 31 stitches x 40 rows = 4″/10cm
Finished Size:
Ankle: 7 1/2″
Cuff: 10 1/2″
Total Length: 14″

Cast On

Disconnect ribber carriage and position it on the left.
Position main carriage with ribber arm on the right.
Set pitch lever to H and rack to position 5.
Set up for industrial rib with edge pairs on the main bed (see note 1): 36L – 35R on the main bed, 35L – 33R on the ribber. Pull one extra ribber needle (35R) to WP to round off the zig-zag row.
Pull ribber needles a little higher than WP and make sure all latches are open. The tips of the ribber needles should be even with the main bed’s gate posts. Main bed needles should be in WP.
Thread the main carriage leaving long tail for seam, set the tension to T0 and RC = 0.
Rack to position 6. Knit from right to left with the main carriage only.
Carefully push the ribber needles back to WP. Make sure the floats that passed over the ribber needles are caught in the needle hooks.
Hang the ribber comb and weights (see note 2).
Connect the ribber carriage and set the carriages to knit circular:  depress the left part button on the main carriage and set the ribber’s right cam lever  to PR.
Set the tension on both carriages to T1. Knit 2 rows, ending COL RC=3.
Transfer the extra ribber stitch on 35R to 34R on the main bed.
Set the tension on both carriages to T2. Knit 1 more row, ending COR RC = 4.

Ribbed Ankle

Set both carriages to knit: release the part button on the main carriage and set the ribber’s right cam lever to N).
Set the tension on both carriages to T5.
Rack to position 5.
Knit 21 rows, ending COL RC = 25.
Transfer the left stitch of each pair of ribber stitches to the corresponding empty main bed needle (see note 3).
Knit 1 row, ending COR RC = 26.
Set pitch lever to P.
Transfer the remaining stitches from the ribber to the corresponding needle on the main bed. There will be two stitches on these needles.

Leg

Drop ribber bed, remove ribber arm and attach normal sinker plate.
Set RC = 0.
Knit 1 row.
* Increase 1 stitch each side.
Knit 4 rows.
Increase 1 stitch each side.
Knit 5 rows. **
Repeat from * to ** 10 more times RC = 100 (58L – 57R).
Increase 1 stitch each side (59L – 58R).
Knit 1 rows RC = 101.

Ribbed Cuff

Set pitch lever to P and rack to position 5.
Transfer pairs of stitches from main bed to ribber for industrial rib 59L – 57R (see note 4). On right hand side, put two stitches on 56R and edge stitch on 57R. On main bed, there will be one stitch every 3rd needle from 57L – 55R.
Transfer heel of each main bed stitch right one needle needle to complete industrial rib setup.
Set pitch lever to H.
Set RC = 0.
Knit 44 rows and bind off.

Finishing

With right side facing, seam ankle rib and leg.
Turn inside out and continue seaming cuff.

Notes

  1. Placing the edge stitches on the main bed means there will be one knit stitch on either side of the ankle seam.
  2. On my Brother, the two beds are close enough that getting the ribber comb and thick industrial rib to hang freely is problematic. I get around that issue by pulling up on the bracket levers and pushing down on the ribber bed to position it slightly lower than normal.
  3. I find that transferring both stitches from the ribber to the main bed at the same time creates a little bump on the inside of the knit that I don’t like. Transferring half the stitches on one row and the other half on a separate row eliminates the bump.
  4. Similar to the ankle rib, placing the edge stitches on the ribber means there will be one knit stitch on either side of the cuff seam. This is a turn-down cuff, so the side facing is the side that will be showing.

Interlocked Bind Off On A Knitting Machine

A few days ago, I was bouncing around the web and stumbled across a post at knitty where Jeny Staiman describes the Interlocked Bind Off.

I tried it out on one of my knitting machines and I absolutely love it. Here’s how…

IMG_0463JPG

Insert your yarn needle through the first stitch front to back and through the second stitch back to front. I’m right-handed so I’m working from right to left on the two needles to the left of the yarn tail. Also note that I’m working with the wrong side facing because this particular pattern instructed me to bind off in purl. Otherwise, I might turn the work before binding off, but it looks good either way.

IMG_0464JPG

Keeping the working yarn on top of the needles, pull the thread through the two stitches…

IMG_0465JPG

… until there’s just a little loop left.

IMG_0466JPG

Bring your needle and yarn up between the same two needles and through the loop front to back.

IMG_0467JPG

Pull on the thread to close the loop. Don’t pull too tight — just enough so the yarn lays flat.

IMG_0468JPG

Then pull the rest of the yarn through. Work your way across the bed one stitch at a time. In this example, I bound off needles 3 and 4 counting from the left. Next, I’ll bind off needles 2 and 3, then 1 and 2.

After binding off the last two stitches, don’t put your needle away just yet. Go through the stitch on needle 1 front to back… then pull the thread, stitching through the loop just like you did when you were binding off pairs of stitches.

IMG_0469JPG

This is what it looks like on the side facing you…

IMG_0470JPG

And this is what it looks like on the side away from you.

N.B. As I said earlier, this pattern instructed me to bind off from the purl side, but this bind off works for ribbed bind offs too. Simply reverse the direction of the needle when stitching into a purl stitch and when coming through the loop if your needle is leaving a purl stitch.

Machine Knitting: Increasing Evenly Across the Row

First, you need to figure out where the increases go. Suppose you have 98 needles in work and the pattern says increase 13 stitches evenly across the row.

Compute the approximate placement of the decreases using the following formula:


(current # stitches - # to increase) / # to increase
(98 - 13) / 13
85 / 13
6.53 rounded down = 6

This tells us we need to space our increases approximately 6 stitches apart.

Determine where to start based on whether you’re increasing by an even or odd number of stitches. If the number of increases is even, position the two center-most increases on either side of center. E.g., if the distance between increases is 6 stitches, the two center-most increases would be on needles 4L and 4R, leaving 6 stitches (3L to 3R) in between.

If the number of increases is odd, position the center increase on either side of center (1L or 1R).

Determine the placement of the other increases by counting off needles working from the center towards the edges. For this example, you would leave 6 stitches between each increase. Temporarily mark the location of each increases by pulling those needles to hold.

Use a garter bar or decker comb to move stitches right or left starting at the edge. You may have to make several passes if your decker comb is not wide enough to transfer all of the stitches at once.

Machine Knitting: How To Use The Blue, Yellow and Green Gauge Rulers

About the rulers

Some knitting machines were shipped with colored rulers used to measure gauge swatches. These rulers are easy to use if you understand how they work.

The rulers come in three sizes: green for standard gauge machines, yellow for mid-gauge and blue for bulky. One side of the ruler is labelled “S” and is used for measuring the number of stitches over 4″ (10cm). The other side is labelled “R” and is used for measuring the number of rows over 4″ (10 cm).

How to use these instructions

The main instructions are for the standard gauge machine with instructions for the mid-gauge and bulky inside parentheses in that order. For example, when it says CO 60 (50, 40) needles, you’ll CO 60 needles on the standard, 50 on the mid-gauge and 40 on the bulky.

What you’ll need

  • A green (yellow, blue) gauge ruler.
  • The main yarn for the swatch.
  • A contrasting yarn of the same thickness as the main yarn for marking rows and stitches.

Knitting the swatch

  • CO 60 (50, 40) needles with the main yarn and knit 10 rows.
  • Knit 2 rows with the contrasting yarn.
  • Knit 30 (20, 15) rows with the main yarn.
  • Use two scraps of contrasting yarn to mark the stitches on the 21st (16th, 11th) needle either side of center.
  • Knit 30 (20, 15) rows with the main yarn.
  • Knit 2 rows with the contrasting yarn.
  • Knit 10 rows with the main yarn.
  • On the left side of the swatch, transfer stitches to adjacent needles to make eyelets indicating the tension setting on the carriage. For example, if your tension dial is set to 4, transfer the stitches from needles 3, 5, 7 and 9 one needle to the right or left to make 4 eyelets. If your carriage has intermediate dots between the whole numbers, skip a few stitches and make eyelets indicating the number of dots.
  • On the right side of the swatch, transfer stitches to adjacent needles to make eyelets indicating the tension setting on the yarn mast.
  • Knit 5 more rows with the main yarn and bind off.

Finishing the swatch

  • Remove the knitting from the machine, stretch it lengthwise to set the stitches and let it rest for several hours.
  • Wash and/or block it the same way you intend to finish the garment.

Measuring the swatch

  • Lay the swatch flat without stretching.
  • Lay the green (yellow, blue) ruler on top of your swatch with the “S” side up.
  • Line up the ruler just beneath the left and right stitch markers with the left end of the ruler just inside the left marker.
  • Locate the mark on the ruler that appears just inside the right marker. The number at that mark is the number of stitches over 4″.
  • Turn the ruler over so the “R” side is up.
  • Line up the ruler between the two center stitches with the left end of the ruler just inside the two contrasting rows at one end of the swatch.
  • Locate the mark on the ruler that appears just inside the two contrasting rows at the opposite end of the swatch. The number at that mark is the number of rows over 4″.

Machine Knit Double-Bed Sock: Short Row Heels Without Holes

Let’s face it. Sometimes you just want to knit a plain, no-frills sock — short row heels and toes, nothing fancy. It shouldn’t take more than a couple of hours. But no matter how hard you try, you knit and frog until you’re completely frustrated as you sit and stare at a pile of crinkled yarn and bare feet.

I’m going to show you how to knit what I call the good-enough-4-me heel. Well… eventually… first I’m going to tell you what causes those nasty little holes in the first place.

Knitting is created with one long continuous thread. When the thread of one stitch isn’t connected to the stitches on either side, you get a hole. That’s really handy if you want a buttonhole, but not so good for a sock heel.

Since you form your short row heel on one bed, the trick is to make sure the edge stitches on both beds are connected when you either begin or end your short rows. You can use this method on both Japanese and French machines for toe-up or cuff down socks regardless of whether you knit your heel on the front or back bed.

How To Knit The Good-Enough-4-Me Heel

When you’re at the end of your circular rows, the last carriage pass must be done on the bed opposite the heel. If you’re going to shape your heel on the back bed, the last pass is on the front bed and vice versa. This may mean that the front of your sock has one more row than the back, but that’s okay. It’ll work out — I promise.


On my Superba, my carriages only knit right to left on the front bed and left to right on the back bed. I shape my heel on the back bed so after knitting my last circular row, my carriage is to my left.


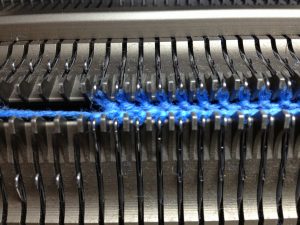
After knitting the last circular row, pull the edge needle next to the carriage to hold. See how the yarn running from the carriage runs underneath the needle? This will manually wrap the needle when we knit across.


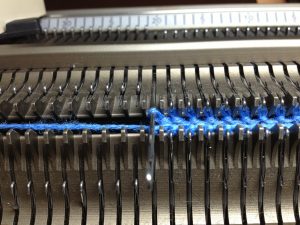
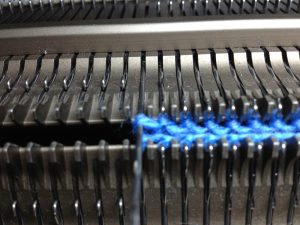
Now knit across. Notice how the yarn travelled from the non-heel bed and floats across the held needle. That’s the thread that will connect the last circular row to the first row of your short rows on this side.


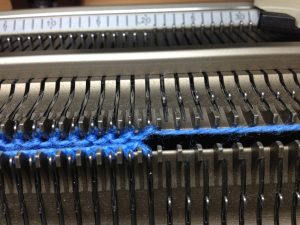
The carriage is now on the right side.


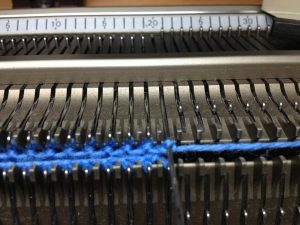
Pull the needle next to the carriage to hold…


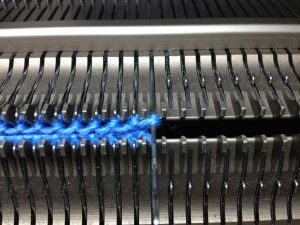
… and knit across. You now have two needles in hold — one on each side. You’ve done two carriage passes and the carriage is back at the side where you started your short rows. For me, that’s on the left.


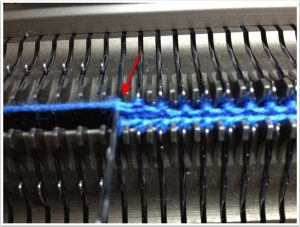
On the carriage side, notice how the thread from the carriage is laying on top of the edge needle. We want to manually wrap the edge needle a second time, so grab that thread…


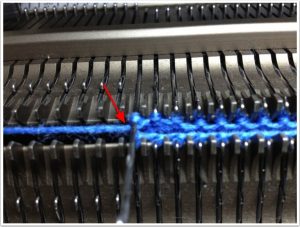
… and move it underneath the edge needle so it will manually wrap the needle on the next carriage pass.


Pull one more needle on the carriage side to hold…


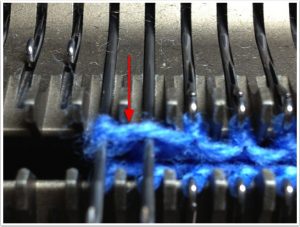
… and knit across. See how the yarn is now floating over the two edge needles. Yes, it looks strange, but ignore it. This is exactly what you want.


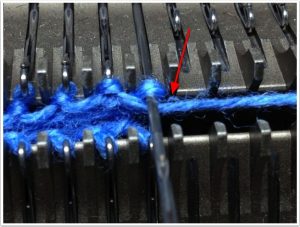
Now do the same for the other side. Move the yarn underneath the edge needle…


… pull another needle to hold and knit across.


You now have four needles in hold, you’ve done four carriage passes, the two edge needles are manually wrapped, there’s a short float running on top of the two edge needles on both sides and the carriage is once again back at the side where you started your short rows.

That’s the end of the manual wrapping for now. Continue to work normal short rows: pull the next needle to hold on the carriage side and knit across, but when you get to the last needle, don’t knit across yet… you need to end the decreases and start the increases on the opposite side in the same row. In other words, at the same time you pull the last needle to hold, you’ll want to push the centermost held needle opposite the carriage back to UWP. Then knit that row. If you happen to forget, it’s not the end of the world — just push that needle to UWP and knit it off manually.

Continue with the increases until only the two edge needles remain in hold. The carriage will be on the side opposite to where it was when you started your short rows. In fact, it must be on that side in order for this to work. The only way the carriage can end up on the wrong side is if you didn’t hold the same number of needles on each side or if you forgot to start the increases in the same row as the last decrease.

We’re not going to knit those last two held needles until after we’ve switched back to circular. The next carriage pass will be on the bed opposite the heel, so you need to use a one-prong tool to manually move those two edge needles back to WP with their stitches and floats in the hooks. If you just push those needles to UWP on a White/Superba, they’ll knit off before they’re supposed to and that’s not what we want. Japanese machines may work differently, but if you want to play it safe — just push them to WP.

Notice that the yarn coming from the carriage simply floats above the edge needle next to it — just like it did when we held the first needle on the other side. This is exactly what you want. This is the thread that’s going to connect the stitch on this side of the heel to the next stitch on the opposite bed.

Set the carriages to circular making sure that the next pass of the carriage will knit on the bed opposite the heel. Continue knitting the rest of your circular foot or ankle.

How do I determine the right setting on the tension dial?

Your knitting machine manual probably includes a chart or two to use as a guide when setting the dial on the tension mast. But if your manual is like mine, those guidelines are based on the size the yarn and do not take the type of fiber into account. Obviously, a slick yarn will move through the tension dial much easier than a fuzzy, sticky yarn like mohair. To get the dial just right, try this trick…

  1. Set the tension dial for the tightest possible tension.
  2. Thread the tension mast as directed for your machine, but don’t thread the carriage.
  3. Pull the end of the yarn straight down toward the needle bed until it’s about 6 or 8 inches above the bed. Attach a plastic clothes pin to the end of the yarn.
  4. Loosen the tension dial one click at a time until the weight of the clothes pin pulls the yarn freely through the mast — the clothes pin will often fall to the floor.
  5. Now, tighten the tension dial one click. This should result in the appropriate setting for that particular yarn.
  6. If the yarn is slick and fine, you may find that the tightest tension setting is too loose. Try wrapping the yarn around the tension dial twice; on the SK-155, you can also try wrapping the yarn several times around the bar next to the tension dial before wrapping the tension dial itself.
  7. If the yarn is thick and fuzzy, you may find that the loosest tension setting is too tight. Try threading the tension mast without wrapping the yarn around the tension dial at all.